When Written: Nov 2018
3D printing has been with us for some time but until a couple of years ago I resisted the temptation to buy a printer, mainly based on the rather ‘Heath Robinson’ look of most of the printers on offer. Whilst many of these can produce good quality prints it struck me that they required a lot of tweaking to do so and the consistency of output often left a lot to be desired.
For my first foray into 3D printing I decided on a printer that was as close to ‘plug and play’ as possible so I could reduce the learning curve before I got a good print. Because of this desire I was drawn to the British made Robox printer ( http://www.cel-robox.com ) with its custom reels of filament that tell the printer what settings it needs and also with its unique print heads with shut off valves to stop the flow of plastic rather than the more conventional method of retraction of the filament. It seemed a very well thought out piece of kit that should remove a lot of the hassle of creating a decent 3D print.
Unless you have had any experience of 3D printing using FDM (Fused Deposition Modelling) you may not be aware of some of the issues involved so I will give a little run down. The process involves pushing a thin ( 1.75 mm or 2.85 mm ) plastic filament through a heated nozzle at between 160 0C and 300 0C. This nozzle is usually 0.4mm microns in diameter but can range between 0.2mm and 0.8mm creating layers of plastic as thin as 0.01 mm. One of your first tasks is to decide what material you are going to print with. The two main types are the bio-degradable PLA and the rather smelly ABS, but it does not stop there as there are also PVA, PET, HIPS, Nylon, Wood, Stone, Metal, Carbon Fibre, Flexible, Glow in the dark, Thermo Color and Amphora to mention the main ones; all are various mixes bringing something to the party. Initially PLA seems the most obvious choice as it is easy to print with, but it does deteriorate in UV and has a ‘glass point’ (the temperature at which it becomes flexible) of 60 0C which renders it useless for many applications. Whilst PLA does not need a heated bed to print on, other plastics do. If a plastic is allowed to cool too rapidly whilst the print is going on, then some serious warping can occur. This caused me massive amounts of grief in the early days as I experimented with materials and different print bed surfaces. In a recent big print I did, the combination of print bed and the plastic chosen bonded so well that I had to remove the bed and use a thin knife to release the print job from it, but at least it didn’t have any chance to warp away from the print bed with adhesion like this! One thing I have learnt whilst experimenting with lots of different materials is that this can bring its own problems. When you change materials, you then have to purge the old material out of the nozzles and sometimes if you change from one temperature plastic to a different one, carbonisation can occur resulting in a blocked nozzle, which is not an easy thing to remedy. A solution might be to stick to one type of material, however you will be missing out on the capabilities of these other materials.
Once you have chosen your material you need to set the temperature of the print head, the print bed, the rate of flow of the filament and a variety of other parameters. With the Robox all this worry is taken away from you with the ‘smart spools’ which have an embedded chip that know about the plastic. All printers use printing software which have different profiles for their materials and you can add and tweak these to your liking, but for 3D printing to become mainstream and reach everyday use it needs to be easy to setup and use. Even valiant efforts by companies like Robox still have some way to go, as a read of the support forums confirms.
It is fair to say that if a print job is going to go wrong it will most likely go wrong on the first layer, if this layer does not stick to the print bed then the subsequent layers will not adhere and the printer will attempt to print the entire job in mid-air, resulting in an effect similar to the output of a spider on acid! A useful guide to some of the problems you can have is on the Simplify3D web site ( https://www.simplify3d.com/support/print-quality-troubleshooting )
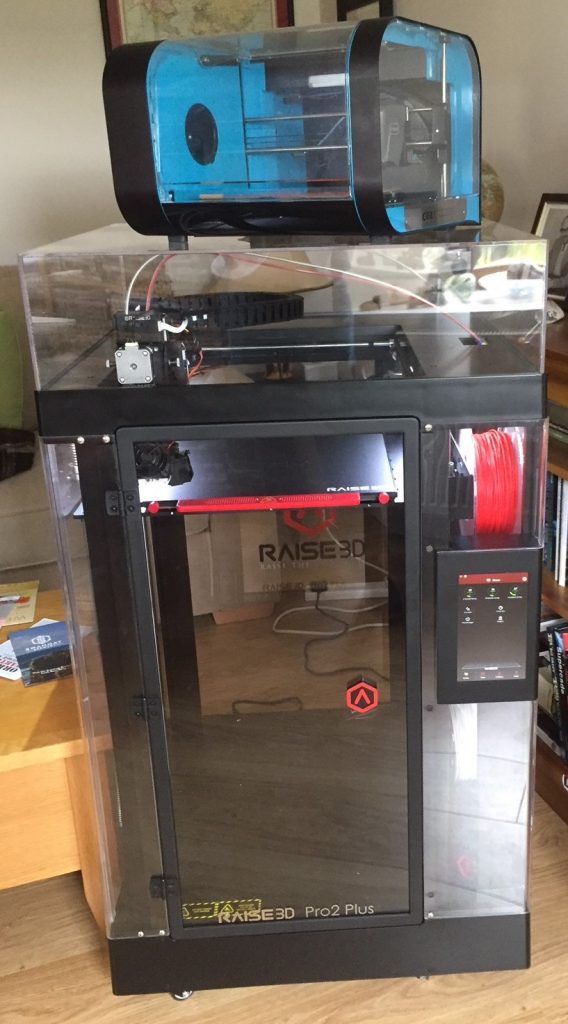
Where you put the printer is another problem with these devices. The garage is not usually a good place for them, they are sensitive little things, they don’t like dust, or moisture and you need to check on them from time to time. The plastic filament itself can absorb moisture which will ruin a print run, so if you are not using the printer for a while you should unload the material and store it in dry containers or de-humidify the print room. The noise whilst printing is another issue, the Robox makes such a noise that it has to be operated at the other end of the house behind closed doors and even then I am aware when the printing stops! Because mainly of its small print volume I decided to purchase a beast of a printer in the form of a Raise3d Pro2 Plus ( https://www.raise3d.eu ) thankfully this is almost silent. Owning and running a 3D Printer is nothing like any other printer you have owned, even a dot matrix with hand loaded ribbons on reels were more trouble free!

Robox printer on top of the Raise3D beast!
So you’ve read the manual, watched a small selection of the vast number of YouTube videos on 3D printing and printers, you have got your head around the basic concept, so what do you print? There are lots of 3D models available on the web for you to download, some are tricky to print and require removable supports to be added to the print job by the software.
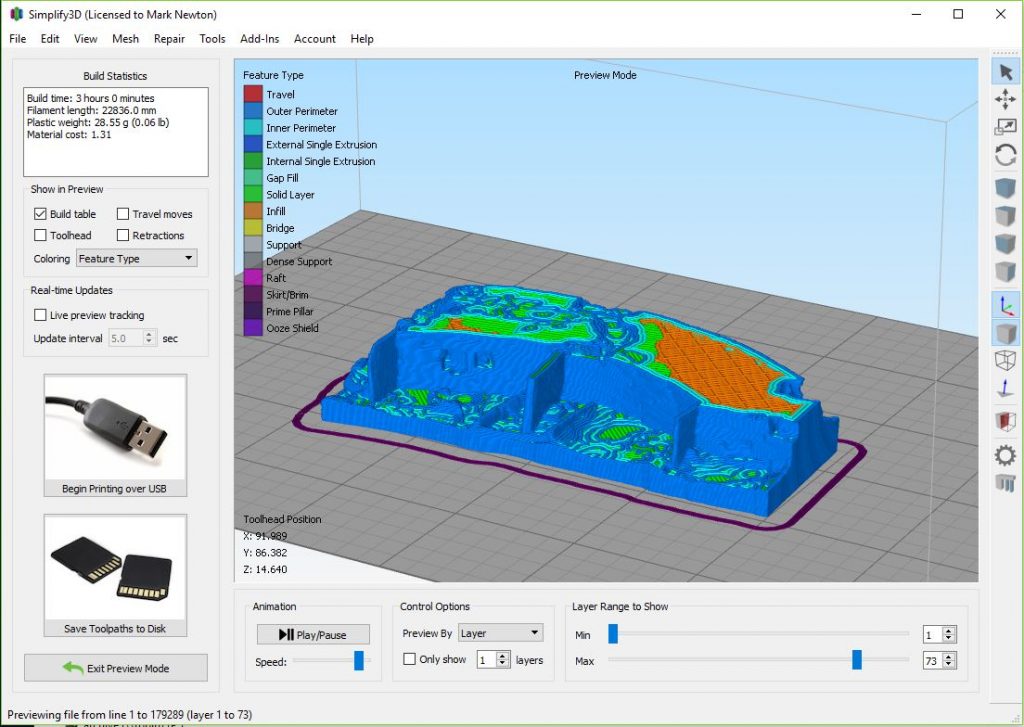
After printing some of these downloaded models it will not be long before you will want to either alter them or create your own. There are lots of programs available, I have found after a lot of trial and error that Autodesk’s Fusion360 ( https://www.autodesk.co.uk/products/fusion-360/overview ) is rather excellent and this normally very expensive software has a free hobbyist licence. It is a full 3D design tool with much, much more than you will ever need and will export your design as an .STL file that the printer software requires. The other piece of free software that is very competent and versatile is Autodesks’ Meshmixer ( http://www.meshmixer.com ) which is also free. This enables you to edit and repair STL files ready for printing. The final piece of software that I have found invaluable is Simplify3D ( https://www.simplify3d.com ). This will take the STL file and will emulate the printer by converting your model into the ‘slices’ – one per layer – that the printer requires. You can then ‘single step’ through each layer and see what is going on and hopefully spot possible trouble spots. This software is not free but the small cost of $149 can result in a lot of saving in time and materials trying to print badly formed STL files.

Simplify3D not only help fix any print problems but allows you to step through a print layer by layer
When you feel all is fine with your model you then load it into the printing software, usually the one that comes with your printer but it doesn’t have to be. This software then takes the 3D STL file and products the slices required and converts these into a series of instructions that the printer understands known as ‘G codes’. The file containing these G code instructions is then transferred to the printer either via a SD or USB stick or possibly USB lead, but as the printer is often located elsewhere because of the noise and the length of print times which are measured in hours and sometimes days that isn’t always practical! The better way to transfer this data to the printer and also control the printer is via a network connection, either cable or WiFi. My original Robox didn’t have this capacity but I added it via a Raspberry Pi box connected to the printer via USB. The Raise3D has all this built in as one would expect on a much more expensive device.
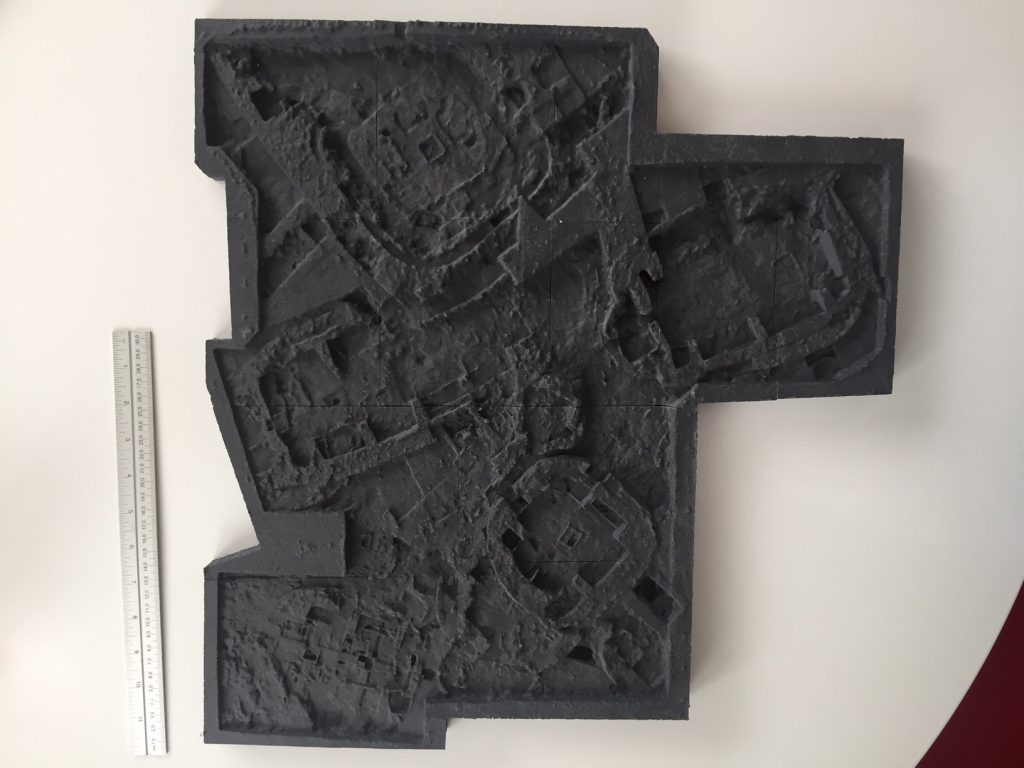
I recently became involved in a big 3D project to print the model of a large archaeological dig here in Orkney ( http://www.nessofbrodgar.co.uk ) . The original idea that one of the archaeologists, Jim Bright and I had was to 3D print some of the 5000 year old buildings that make up the world important Ness of Brodgar dig. This dig has been going on in the summer for eight weeks each year since 2005. My initial tests were done on the data model of a single wall of Structure one. The initial reaction to this model, which I printed at various sizes and resolutions was encouraging albeit it was shown mainly to people involved in the dig. We then showed it to the Site Director Nick Card, who suggested that it would be good to see a one metre by one metre square model of the largest part of the site. Yes we said, no problem we said. Obviously the final model would have to be made up of several pieces as the printer I had at the time only had a build volume of 210mm x 150mm x 100mm. The data we had access to was generated in 2016 and generously provided by Dr Hugo Anderson-Whymark ( https://sketchfab.com/hugoandersonwhymark ) . Before you attempt printing this type of data it is worth taking a little time examining the model without its overlay of colour from the photos, this colouration convinces the eye that there is more detail that is actually there, by examining it without this confusing information you get a better idea of what your finished 3D print might look like.
It is not a simple task of taking this data and throwing it at your printer, you will get a mess, if anything at all as my first tests demonstrated. One of the issues is that the data will often consist of just a top ‘skin’ of zero or very small thickness. The printer will see this and end up printing nothing as it is too thin for it to reproduce. Our first job is to thicken this first layer and to do this we used the ‘Solidify’ function in the open source Blender program, this gave us something that the next processes could work with. The model was then extruded down about 100mm using Meshmixer, this was then sliced at a suitable depth to make a flat base to the model. Any model that you attempt to print should have a complete manifold, this basically means that the mesh of triangles that it is made of is complete with no holes or broken triangles, whilst it is possible to print such a model the results can be unpredictable, and if you start slicing up as we will need to do, things can go a little crazy with large ‘spikes extending beyond to area of the model appearing. Many programs have options to ‘fix’ a broken manifold although often they will make a dreadful attempt and you will end up with large areas of lacking detail. I wish I could tell you a definitive way of avoiding this but I can’t, experimentation with different methods is the only way as each model is different, but again Meshmixer is a handy tool. When we were doing our tests, Jim and I almost gave up at after about three weeks, we were starting to think that this particular data would not convert for 3D printing, but with perseverance we managed to get some tests successfully printed. We were sensibly just testing with a small segment of the model, now was the time to put what we had learnt and apply it to the full set of data. This data was generated using photogrammetry, combining some six hundred photos to produce a 3D model made up of over four million triangles. This was a slow process because of the complexity of the information and nearly brought our machines to their knees! The next task was to slice the full model into the sized pieces that we will intend to print. It is fair to point out that there was no funding in place for this project, it was really a proof of concept idea. I printed the first two slices to show and I also took a look the amount of plastic material it would use, my heart sank when I calculated that it would use about £600 of material, this was a bit of a set back. But all was not lost, digging back to my school days maths, if we halved the length of the sides to a still reasonable 500 cm then the volume would reduce by a factor of eight bringing the material cost to a more reasonable £75 so it was decided that the project could continue. The total print time ended up being fourteen days and nights, although of course it took longer than this because the print was done in eleven sections with removal and set up times added. Although 3D printers don’t use a lot of electrical power ( about 200W ) the extended period of printing can make a significant impression on your electricity bill! The segments were finally glued together in time for the final public open day at the Ness, we are not sure but this might have been the first time such a thing has been attempted on an active archaeology dig.
We now intend to use these techniques to produce more models of such data but using the larger print volume of the Raise3D printer. The ability to visualise an object on the computer and then to produce a physical object is a fascinating process but fault free and easy is it not currently the case.

3D print of the Ness of Brodgar dig, made up eleven separate prints approx 2 weeks print time!
Article by: Mark Newton
Published in: Mark Newton
